
D o you want to create a blog survey for your website?
A blog survey helps you gather valuable information that you can use to drive your website forward. In this article, you’ll learn why it is important to use surveys for your blog’s growth, strategies for making sure you get the right answers, and how to create a survey in WordPress.
In This Guide:
Let’s get started!
Why Blog Surveys Are So Important
Blog surveys are an excellent way to get honest feedback from your readers and subscribers. Instead of guessing what your target audience wants, you can find out exactly what they want to see and what they’re not so interested in.
For example, you can discover:
- Who is actually reading your blog (age, gender, location, interests, etc.)
- What content people would like to see more of
- What issues or problems they have with your blog
- What products or services they might be interested in purchasing in the future
- Any ideas or suggestions they have for improving your blog design or content delivery
All of this information can help you identify and fix any problems. Surveys can help you enhance the customer experience and expand in areas that you might not have considered.
How to Ask the Right Questions and Get the Most From Your Blog Survey
There’s a right way and a wrong way to ask questions so that people are more likely to answer them. Here are a few pointers to help you get the most from your blog survey.
1. Define Your Survey Goals
The first step is to come up with some goals for your survey. If you don’t think of these at the beginning, your survey might come across as directionless and end up confusing people due to the lack of focus. So make it clear to respondents, precisely what information you want. Well-defined goals will help you create a focused and effective survey.
Some goals might include:
- Getting feedback on a recent event
- Finding out demographics about your readers
- Discovering levels of interest around an upcoming course or product
2. Keep It Short
With your goals in mind, limit your survey to make sure it is short and only takes a few minutes to complete.
If you’ve ever completed an online survey, you’ll know how easy it is to get bored when the questions drag on and become meaningless.
In the same way, your respondents will want to get the survey completed as quickly as possible. If your survey is too long, people will likely abandon it.
Remember, it’s better to have 100% of respondents complete a 5-question survey than 10% complete a 20-question survey.
To ensure a better response rate, learn to create surveys that are concise and focused. If it’s necessary to have a long survey, then you’ll have to offer a participation reward. Which leads to the next point…
3. Consider Offering an Incentive
Some of the more prominent surveys put entrants in a draw to win a prize if they complete the survey. It’s a way of showing readers that you are serious and also helps them understand that their answers are valuable.
For example, PickMyPostcode runs daily survey draws where entrants answer today’s survey questions for a chance to win £50 or more.

If you need to run a survey with a prize, then offer something related to your blog.
On the downside, you can run the risk of getting survey data filled out by people who aren’t particularly interested in helping – they just want to win a prize. However, offering a prize allows you to create more of an incentive for participation and can boost survey response rates significantly.
4. Use Simple Language With Minimal Jargon
Make sure you use language that is easy to understand. Readers don’t want to spend time trying to understand questions.
Also, avoid using industry-related jargon. What seems obvious to you is not necessarily known by everyone else.
Keep the language simple and to the point.
5. Limit Response Options
There’s a marketing rule called “choice paralysis,” which says that the more choices you give people, the less likely they are to make one.
It stems from a famous study by psychologists Sheena Iyengar and Mark Lepper where they found that a display table with 24 varieties of jam attracted less interest than a table displaying only 6 varieties of jam.
Hick’s Law, named after British psychologist William Edmund Hick, states that the time it takes for an individual to make a decision is directly proportionate to the possible choices he or she has.

That’s why it’s important to limit people’s response options and get more accurate answers to your questions.
For example, when you’re asking people to rate how satisfied they are with your blog content, you could use Likert scale questions, providing them a choice of five ratings:
- Very Unsatisfied
- Unsatisfied
- Neutral
- Satisfied
- Very Satisfied
Once you’ve asked them to select one answer to these rating scale questions, you can offer them a free-text box where they can give the reasons for their choice. For example, if their rating is “1” or “2”, you could ask follow-up questions like, “How can we improve?”
6. Avoid Overlapping Answers to Multiple-Choice Questions
Make sure multiple choice questions can only have one answer. For example, if you ask people their age, don’t offer these ranges:

People aged 25 and 35 wouldn’t know which answer to select as they have two options, and your data would become skewed.
7. Promote Your Survey
Once you’ve set up your survey, you need to let your audience know that you need their help. For example:
- Blog: write a blog post that outlines the reasons for running your survey.
- Email: send an email to your subscribers with a simple, direct subject line: “We need your help!” The body of the email itself should tell people why you’re doing the survey and, most importantly, let them know how valuable their input is.
- Social Media: depending on the survey topic and the respondents you want, you could promote your survey on social media.
And, as always, make sure you say please and thank you and show your appreciation.
Five Example Blog Survey Questions to Ask Your Audience
Based on what I’ve covered, here are 5 customer satisfaction questions to get you started as you build your survey:
1. On a score of 1 to 5, what’s your overall experience of our blog?
- Very Unsatisfied
- Unsatisfied
- Neutral
- Satisfied
- Very Satisfied
Pro Tip: Use a 5-star rating system for readers to rate your blog.

2. Based on their rating, the next question could be one of two open-ended questions:
- If the rating was 1 or 2, ask: “How can we improve?”
- If the rating was 3, 4, or 5, ask: “What do you like best?”
3. What type of content would you like to see more of? (Click all that apply):
- Tutorials
- Videos
- Reviews
4. What additional products or services would you be interested in purchasing? (Click all that apply):
- Ebooks
- Online Courses
- Exclusive Membership Content
5. Please tell us a little more about yourself:
Which age range are you in:

Which part of the world are you from:

What topics are you most interested in learning about?
Learn How to Create Surveys With WPForms (Step-By-Step Walkthrough)
There are plenty of tools you could use to run an online survey, including free options like Google Forms. However, the downside of these tools is that the data is stored on third-party servers, you have limited customization options, and some restrict the number of responses you can collect.
That’s why I’m a firm believer in hosting a survey on your WordPress blog using WPForms:

WPForms includes a powerful Surveys and Polls Addon that makes it easy to create survey forms on your website, so you can:
- Create a fabulous survey with the drag-and-drop form builder.
- Add smart survey fields like Rating, Likert Scale, and more.
- Use conditional logic to personalize survey fields based on user input.
- Generate survey reports with bars, graphs, charts, and tables.
- Export or print the survey results in JPG or PDF formats.
Let’s take a look at how to create and manage a survey with WPForms.
Step 1: Create a New Form in WordPress
For this tutorial, you’ll need to install and activate WPForms Pro.
Note: If you need help, follow our step-by-step guide on how to install a plugin in WordPress.
Then, you’ll need to install and activate the Surveys and Polls Addon.
To do this, go to WPForms > Addons and find the one labeled Surveys and Polls Addon:

Click Install Addon, and then Activate.
Now, you’re ready to create your survey!
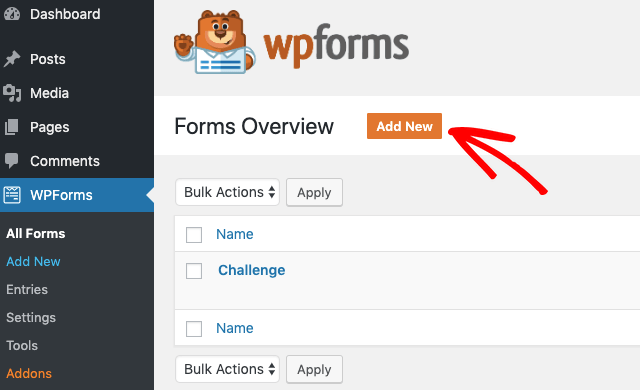
Click the Add New button in the WPForms menu to launch the drag-and-drop form builder:
Enter a name for your form:

And then scroll down the page and select the Survey Form template:

Now, you’ll see your survey form displayed with some sample fields:
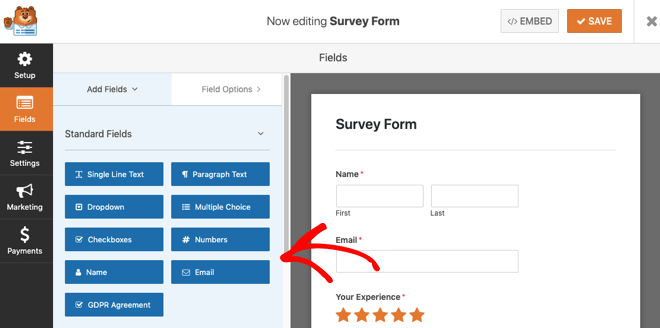
You’ll notice your survey form already has the following fields to help you get started:
- Name
- Rating
- Likert Scale
- Paragraph Text (For written answers)
You can customize these fields according to what types of questions you’d like to ask site visitors.
So, let’s take a look at what you can do.
Step 2: Customize Your Survey Form
The drag-and-drop builder in WPForms makes it easy to add, remove, and reposition fields on your survey form. You can add form fields by dragging them from the left-hand panel to the right-hand panel. For example, drag the Multiple Choice field onto the form:
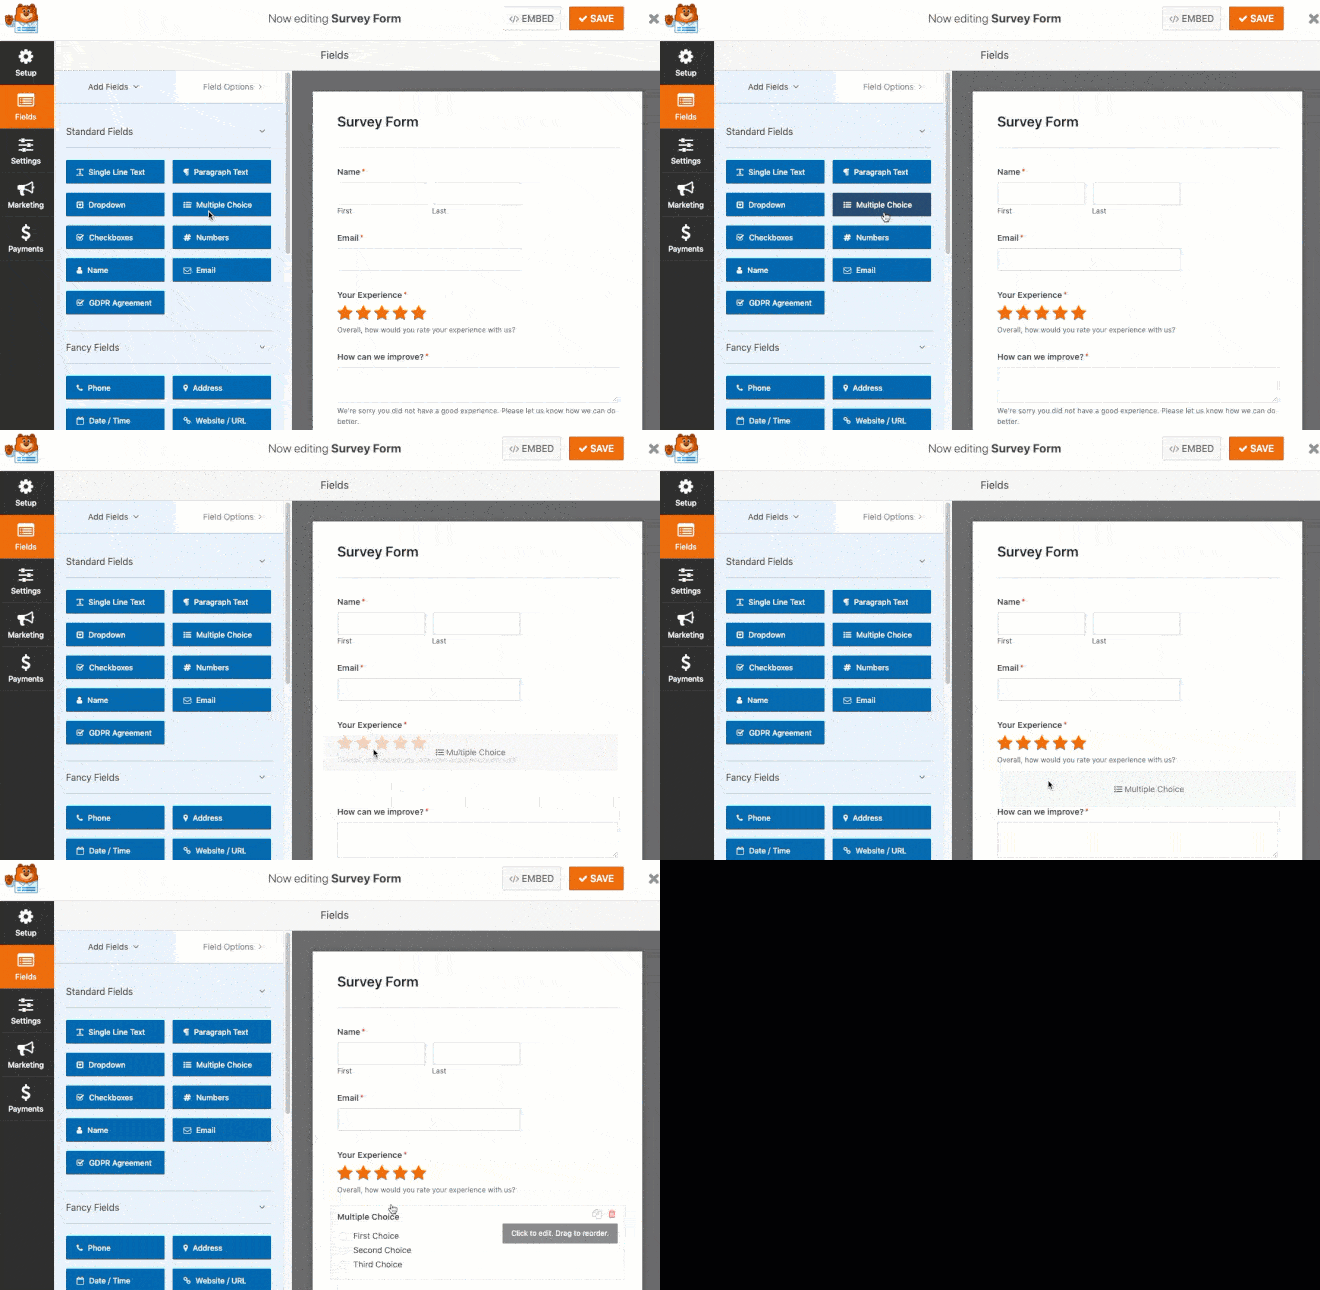
If you click on a form field, you’ll see the options to edit, reorder, or delete it:

WPForms has all the standard form fields for building interactive survey forms, including Single Line Text, Paragraph Text, Dropdown, Radio Buttons, Checkboxes, Likert Scale, and Rating.
You can also customize these fields to suit your survey. Let’s take a look at customizing the Likert Scale.
Click on the field in the form on the right to open the field options on the left:
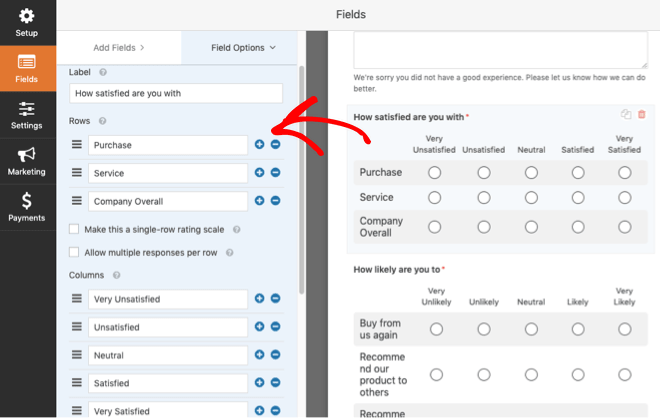
You can change:
- Label – the introduction to the item you’re measuring.
- Rows – the survey questions you’re asking visitors. For example, you could change this to Blog, Newsletter, and Overall Experience. And, depending on your survey question, you can allow multiple responses per row.
- Columns – the responses visitors select.
Pro Tip: For more help with this step, check out our tutorial on customizing the Likert Scale field.
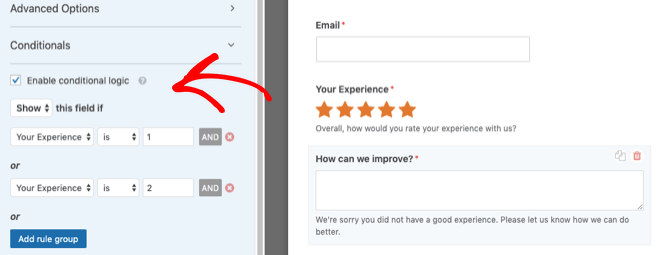
WPForms also includes conditional logic, which means you can personalize your survey questions based on the user’s answer in one of the previous fields.
For example, you could set the “How can we improve?” question to display only if the “Your Experience” rating is “1” or “2”:
Pro Tip: For more help with this step, check out our tutorial on how to use conditional logic for ratings.
Step 3: Configure Your Survey Form Settings
There are 4 settings panels to configure on your survey form:
General
The General settings let you change the form name, customize the submit button, enable the anti-spam honeypot feature, and disable storing entry information and user details (like IP addresses) to further comply with GDPR.
Notifications
The Notifications setting allows you to receive an email when someone completes your blog survey form. And if you use smart tags, you can also send a notification to respondents when they complete your survey to let them know you received it.
Pro Tip: For more help with this step, check out our tutorial on how to how to set up form notifications.
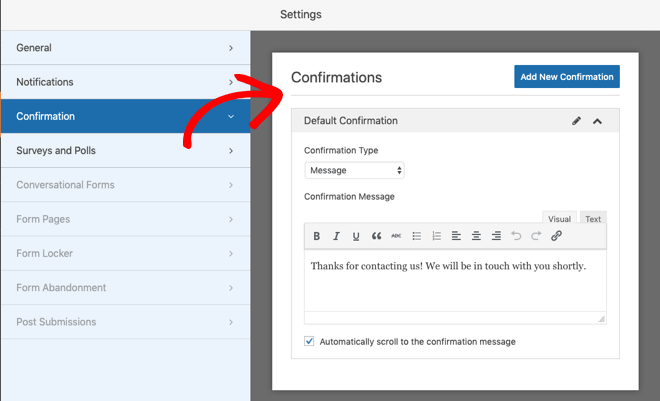
Confirmation
The Confirmation setting lets you display a message to respondents when they complete your form:
Pro Tip: For more help with this step, check out our tutorial on how to set up form confirmations.
Surveys and Polls
The Surveys and Polls setting allows you to receive the results from your survey form as respondents complete it. From Surveys and Polls, click on the Enable Survey Reporting checkbox:
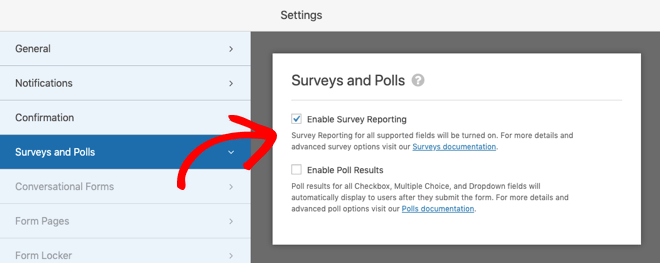
Note: If you used the Survey Form template, this option is enabled by default. But, if you used another form template, you’ll need to check the box.
Step 4: Add Your Survey Form to Your Website
Once you’ve finished customizing and configuring your survey form, you can add it to your site.
WPForms lets you add your forms to multiple places on your website, including your blog posts, pages, and sidebar widgets.
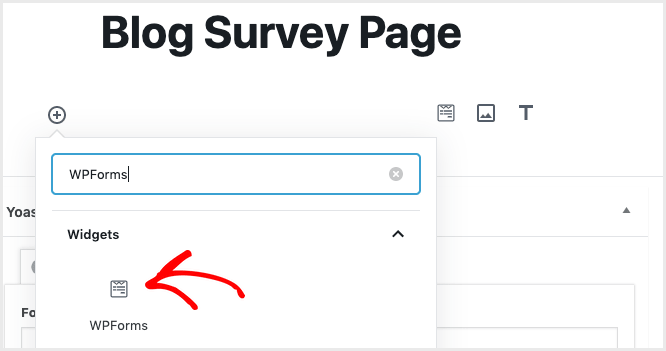
Here’s how to add it to a page using the Gutenberg Block Editor:
Go to the block where you want to add the survey form and click on the “+” icon. Search for “WPForms” and click on the WPForms icon to add it to the block on your page:
Now, select your survey form from the WPForms dropdown:
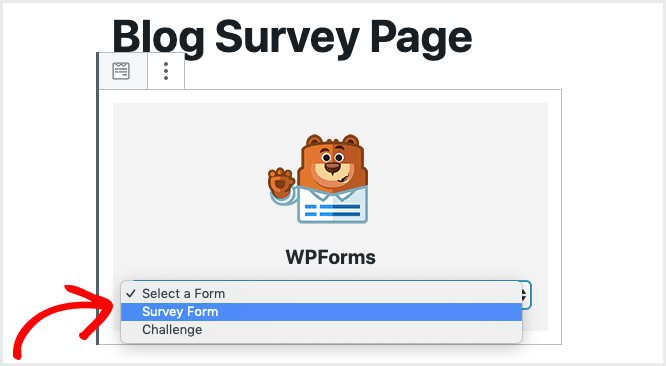
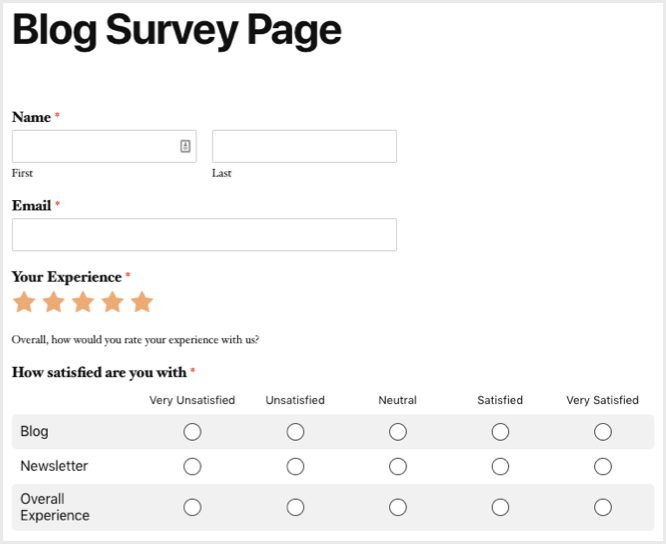
Save your draft and preview the page:
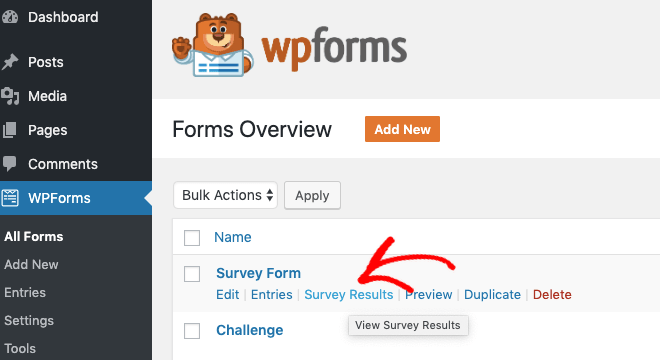
Step 5: View Your Survey Results
Once people start filling in your survey, you can view the results:
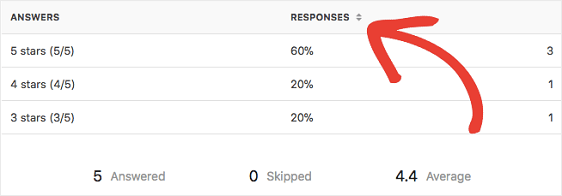
You’ll see the results for each question. For example, here’s how the Star Rating results might look:
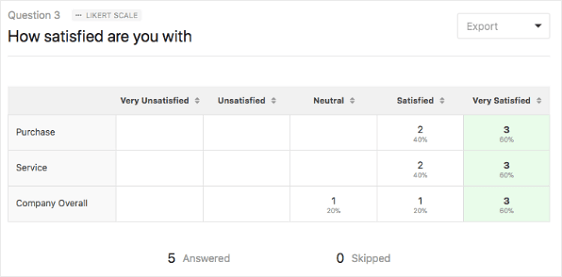
And, here’s an example of a Likert Scale result:
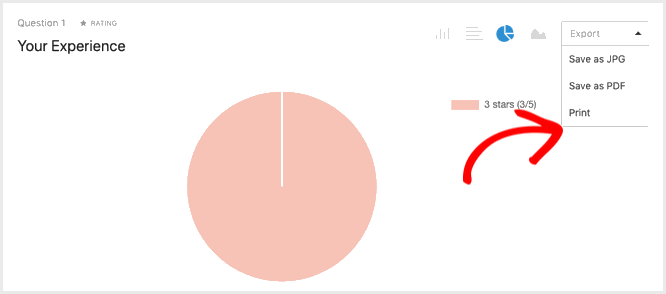
There’s also an option to Export the results as JPG, PDF, or Print:
Key Takeaways on Blog Surveys:
- Understand the Importance of Surveys: Surveys are a crucial tool for gaining direct feedback from readers, helping to understand their preferences, and enhancing the blog based on actual data rather than assumptions.
- Setting Clear Goals: Start with clear objectives for your survey to ensure it is focused and yields valuable insights, such as gathering feedback on specific content or understanding reader demographics.
- Effective Survey Design: Keep surveys short and questions clear to avoid overwhelming participants. Use different types of survey questions and limit the number of questions and response options to increase completion rates and improve the quality of data collected.
- Incentivizing Participation: Offering rewards can significantly increase participation rates, though it’s important to balance the desire for high response rates with the risk of attracting disinterested participants.
- Simple and Jargon-Free Language: Use easy-to-understand language and avoid industry jargon to ensure that all readers can easily participate without confusion.
- Promotion Strategies: Effectively promote your survey through multiple channels, such as blog posts, emails, and social media, to reach a wider audience and ensure a higher response rate.
- Leverage Technology with WPForms: Use tools like WPForms for WordPress as a survey builder to create, manage, and analyze surveys efficiently. WPForms’ Surveys and Polls Addon provides an intuitive platform for adding various types of questions and customizing the survey layout.
- Analyzing and Acting on Feedback: Regularly review survey results to understand reader satisfaction and areas for improvement. Use the insights gained to make informed decisions that align with reader interests and preferences.
Closing Out On How To Create A Blog Survey
Now you know the benefits of running a blog survey and how to create one on your WordPress site.
So, what are you waiting for? Get started with the most user-friendly WordPress forms plugin today and create your blog survey!
If you have any questions, let us know in the comments below.


0 Comments
Join in. The comments are closed after 30 days.